Wednesday, June 30, 2010

3Birds was on The Shopping Channel yesterday along with our Provo Peeps!! The Cricut Design Team made some amazing samples with the 3Birds Straight From the Nest Cartridge! Thanks to our own amazing Carmi, we wanted to share some samples with you! Be sure to stop by Carmi's Blog as well to view some of her amazing samples with new products too!

Monday, June 28, 2010

Hey 3Bird PEEPS!! Nest Flash: This just in! Our Website is offering a ONE DAY ONLY free shipping special. All orders that are $65.00 or more, placed on Tuesday, June 29th, 2010 will recieve FREE SHIPPING! Isn't that "TWEET!?!" This is your chance to restock your nest and save!!! Enter coupon code: freeship061day during checkout.

sweet baby layout

Hi, Heather here again. This week my project is a layout of my youngest (for the next 7 weeks at least :))
I love to use lots of pictures on my layouts but don't always know how to place them on the paper. So one of my favorite things to do is a photo collage, using my photo editing program. A great way to be able to tell the whole story using all these great pictures we take.


I used 3 sheets of cardstock from the Must Have Cardstock Stack Pastels. I used the backside of a yellow sheet to get the white. I trimmed the white to 11x11 and layered it over the pink 12x12 cardstock. I cut the pink polka dots from a sheet from the Focus on Photos paper stack. For the butterflies, I punched shapes from the Straight From the Nest 12x12 Adhesive & Cardstock Paper Stack. I wanted them to have dimension so I just left the backing on and stapled them to my layout. The sweet little title sticker is from the OverStuffed Craft Kit.

Wednesday, June 23, 2010

Christmas in ... almost July!

Is it hot where you are? It is here in Florida. How about a few cards representing cooler times to give you a creative jump on your Holiday cards or maybe just for fun!


Two Trees Christmas card.
Supplies:
Must Have Foil Stack 8x8
Bling Goodie Box
Sticky Sparkly Letters and Shapes - A Play on Words
Opposites Attract Winter Edition Rubons

Instructions:
Fold your 8x8 Pre-shaped foil paper in half for card base.
Cut two triangles (for trees) from green foil paper and adhere to left of card.
Add chipboard gold border to card as seen and cut off extra from edges.
Adhere chipboard greeting, stars to card.
Place rhinestones on tree.
Last, add rubon snowflakes to card.


Happy New Year card.
Supplies:
Opposites Attract Winter Edition - paper, cardstock and rubons
3D embellishment kit (coming soon!) - clock
Super Sticker Nestables (coming soon!) - border

Instructions:
Place clock paper on far left of card base.
Add strip of light blue cardstock to right of clock paper.
Cut out clock form patterned paper, place rubon and 3d embellishment clock on top.
Add rubon greeting below clock.
Adhere adhesive border to far right of card.

Have a great day, Charity

Sunday, June 20, 2010

Happy Monday!


Hi, hope everyone had a wonderful weekend. I'm here again to share a 3birds layout with you. We have been getting so much rain and storms here lately that I jumped on the chance to take a couple photos of my daughter when the weather was nice. I loved the dreamy expression she has in this photo and found some bright & whimsical 3birds products to compliment it just right.


I am a huge fan of the Straight from the Nest cricut cartridge and used it for the bottom layer of my flower. I just crumpled it a bit and used a copic marker to outline the edges for more dimension. I also used the cartridge for my title. This cartridge has really fun and sweet phrases on it. It's definitely one of my favorite cartridges right now! I also used the Super Sticker Nestable hearts & love how easy they were to use. And what an eyecatcher for any page too!Hope the weather stays nice in your neck of the woods and you can be outside enjoying it too!


Supply list:

layered heart-3Birds Super Sticker Nestables (coming soon!)


cardstock-Bazzil


threading water punch- EK Success

Friday, June 18, 2010

Happy Father's Day!

Hello everyone, it's Ilene again, here to share a LO that's holiday-appropriate :) I have one of my wonderful DH with our little boy, and the pp was just perfect for this photo. I especially love how the foil chipboard accents from Sticky Sparkly Letters and Shapes matched with the new foil papers. The foil has adds that little touch of something special, don't you think?

Also, take a look at the upper right corner - I wanted the "backside" to show, so I made the pp be double sided by gluing a sheet of pp to the back. Most times, you only need the one side of a pp and having it be double sided is a waste. But those times you do want to reveal a little backside, you could always easily adhere some coordinating pp to the back.


Supplies: Patterned Paper: Straight From the Nest, Cardstock: Must Have Foil Stack, Straight From the Nest Adhesive Cardstock, Stickers: OverStuffed, Chipboard Embellishments: Sticky Sparkly Letters and Shapes, Flowers: Perfectly Pretty Petals, Bling: Bling Goodie Box

Wednesday, June 16, 2010

Making Your Pages Sparkle

Hello everyone! I'm Laura and I'm so excited to share with you some of the wonderful things you can do with 3 Birds Design products! My goal is to give you an "aha moment" when you see my projects that you can take with you and inspire you to recreate on your own projects! If and when you create a project using inspiration from mine or any other of the design team members designs please link it in the comment section! We'd love to see what you're creating!!!

This is my first project I created using Must Have Cardstock Stack, Straight From The Nest Paper Stacks, Sticky Sparkly A Play On Words, Perfectly Pretty Petals Paper Flower Kit, Must Have Foil Cardstock Stack, and the Bling Goodie Box.

One thing I love about 3 Birds products is how well and cohesively all the products work together! Let me show you some little added touches I created to make my project, and yours too, one of a kind and unique!


First of all pull out those paper punches! You can create beautiful touches to your projects with a simple punch pattern. I used a border punch, flower punch and a butterfly punch to create accents on my layout.


Secondly don't be afraid to layer! Layer those gorgeous flowers from the flower kit for extra color and dimension. Punch out several of the same shapes and layer them! I also pulled out my crimper and created extra texture on the accents. I also folded the flower petals for extra dimension! Add buttons and string and voila!


To help keep the accents securely fastened, I grabbed my favorite liquid glue 450 Quick Dry Adhesive by Helmar USA. 450 Quick Dry is just that, quick drying and acid free!


Banners are hot right now in paper crafting and you can recreate it to for your projects! 3 Birds has an amazing cricut cart out entitled Straight From The Nest that has an amazing banner that you can cut out using any of your 3 Birds cardstock, foil stacks or patterned papers. To give the banner added dimension and height I used Zap Dots by Helmar USA. I'm big into dimension....I think you'll see that more and more in upcoming projects!

Well there you go! I hope and trust you were inspired by what I brought to you today!

Thanks for stopping by! Now get scrapping!

Laura Achilles
3 Birds Design Design Team Member

Monday, June 14, 2010

Design Team inspiration

Hello all! This is Heather. Today I have a couple of cards to show you using the great products from 3 Birds Design. First up is a birthday card.


I used 3 colors of cardstock from the Must Have Basic Cardstock Stack. The white is just the backside of the brown :) I embossed the white background and one of the candles to add some interest.
Next I wanted to use the scraps from the first card to make another card.


I added the baby blue color from the Must Have Pastel Cardstock Stack and the Orange scallops from the Must have Bits & Pieces cardstock Diecuts and Shapes. I drew the kite shape on the back of the cardstock and cut it out.

Friday, June 11, 2010

Design Team inspiration

Hi everyone! I'm Charity Hassel, another new design team member here at 3 Birds!
Today I wanted to share a page I made for my brother and his family using some of the fabulous product from 3 Birds.


Favorite Memories.
supplies:
Brown cardstock- 3 Birds 64-piece Must Have Cardstock Kit

Chipboard title and branch- Sticky Sparkly play on words
sequins- Bling Goodie Box
patterned paper- Straight from the nest patterned paper and cardstock set.
stickers and rubons- 3 Birds Fall & Winter Opposites Attract Kit


I made my own tags from patterned paper by cutting the papers into long rectangles and cutting the edges to form tags.
The bird embellishment is a wood bird that comes with 3 Birds 10,000-piece Overstuffed Craft Kit.

Thanks so much for looking and have a great day!

Wednesday, June 9, 2010

Design Team Post #2 by Marcie!


Hi everyone! My name is Marcie and I will be the second design team member to provide you with some wonderful 3birds inspiration. When choosing the paper for my layout I was instantly drawn to the vivid colors and designs in this patterned paper in the Focus on Photos pack. I used white cardstock as my background and sprayed blue Tattered Angels glimmer mist over it in a random spray design. I then sewed a funky outline to frame my layout-love my sewing machine! I then took coordinating lime green paper from the same Focus on Photos pack and tore the edges and crumpled them up before adhering them to my cardstock. I then took the patterned paper and cut different sizes of stips and layered them over the solid paper. For a little more interest I took a few strips of solid blue and green paper from the same paper pack and sewed them over the patterned paper strips. I then adhered the photo in the center and added fabulous chipboard embellishments from the Sticky Sparkly Letters & Shapes A Play on Words. I also added a little "Just Being You" sticker from the Overstuffed Kit to one of the chipboard embellishments and added a bit of stickles. Lastly I did the title. I used the mini rubons in green from the Overstuffed Kit and put them onto a small piece of white cardstock outlined with blue marker. I then cut the "All Natural" from the Straight from the Nest cricut cartridge and added stickles for some extra pop! I think everything went together so well & was so easy to match up! Hope you like it!

Supply list:
white cardstock-Bazzil
sapphire glimmer mist-Tattered Angels
lime green solid paper-3Birds Focus on Photos pack
chipboard flowers, butterfly, & journaling bracket-3 birds Sticky Sparkly Letters & Shapes A
"just being you" sticker-Overstuffed Craft kit
mini-alphabet rubons in green-Overstuffed kit
royal blue marker-zig
stickles-Starry Night & Cinnamon from Ranger

Tuesday, June 8, 2010


Some samples.... with the new products!! These pics don't do the foil paper justice! You have got to get these!!!!!


HSN Today!

3 Birds Straight from the Nest Paper Stacks
I am so excited to show you a new product I helped design debuting on HSN today. Straight from the Nest Paper Stack! The best part of the stack? Not only does it coordinate with our Straight from the Nest Cartridge...it also includes adhesive backed pattern paper that can be used in the Cricut. Instant stickers!


3 Birds Must Have Foil Cardstock Stacks
Also debuting today is our new Foil Paper Stack. These papers are BEAUTIFUL!

Be sure to watch HSN today to see the stacks featured by our Hostess Donna at 6am, 9am and 1pm.

Monday, June 7, 2010

First official DT post!

And I get to be the one to kick things off! How awesome is that :) It's me, Ilene, and I want to say hi to everyone who's reading. The DT has a lot in store to share with you guys and I hope you will all be inspired! A little bit about me - I have 2 kids and I promise you'll be seeing a lot of them :) I really can't help myself. Today I want to share two layouts that both feature my DD. She's 5, almost 6, and has quite a personality. I used the new foil papers with both layouts, and I love how it turned out. If you're afraid to try foil because it's got...well, quite a lot of shine to it, then you can try to tone it down, as I did, by only leaving small parts of it. I used it in moderation to accent parts of the layouts, and I think it added a lot of that "wow" factor and helps draw attention to the photos themselves. Well, take a look for yourselves.

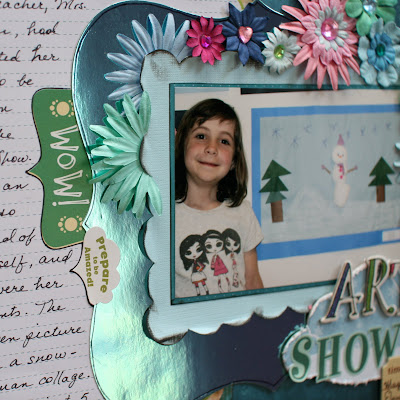
The first LO is called "Art Show". I layered a lot of flowers and did some distressing. You can also cut the flowers in half, like I did in the corners for variety. Personally, I like a busy look on a page, and the more to look at, the merrier. You can do that by layering a lot and adding a lot of embellishments, and then layering the embellishments as well - for example, I placed a star-shaped crystal on the chipboard star in the upper right corner. Layering embellishments makes it that much more interesting.


Supplies: Patterned Paper: Straight From The Nest , Opposites Attract (Winter), Cardstock: Must Have Foil Stack 8"x8", Must Have Bits and Pieces 2 (Pastels), Straight From The Nest Adhesive Cardstock , Stickers, Letters and Chipboard: OverStuffed Craft Kit, Sticky Sparkly Play on Words; Flowers: Perfectly Pretty Petals; Bling: Bling Goodie Box, Ink: Inky Alphas

Here's another LO about DD, and this one is a little less busy and has more "White space". I'm not a big fan of white space so I filled some of it wish color spray. Lots of brands make color sprays, and this one is by Tattered Angels. Paint, color sprays, ink, etc are great ways to customize your patterened paper. Sometime the paper is not quite the right color, or isn't exactly what you need, no matter how great it is. But always remember - you're the artist and you can cut it up and otherwise alter it in any way you like.

Once again I layered the embellishments - the #1 on top of the thought bubble, the bling heart on the chipboard quote, etc. The arrow I got by cutting an embellishment apart. Just remember that you can do anything you like with your supplies and the more you do, the more you make them "yours".


Supplies: Patterned Paper and Adhesive Cardstock: Straight From The Nest, Cardstock: Must Have Foil Stack; Stickers: OverStuffed Craft Kit; Letters and Chipboard: Sticky Sparkly Play on Words, Bling: Bling Goodie Box

Well, thank you everyone for taking a look at my creations. I am really looking forward to sharing more with you over the coming months, and I hope you all come to love the 3Birds products as much as I do!