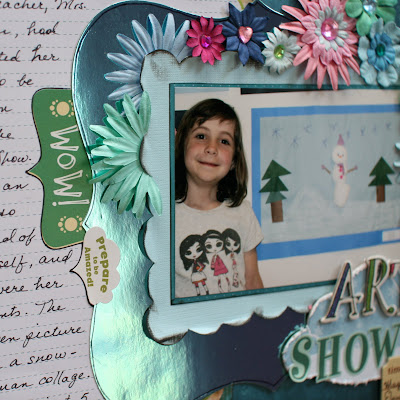
The first LO is called "Art Show". I layered a lot of flowers and did some distressing. You can also cut the flowers in half, like I did in the corners for variety. Personally, I like a busy look on a page, and the more to look at, the merrier. You can do that by layering a lot and adding a lot of embellishments, and then layering the embellishments as well - for example, I placed a star-shaped crystal on the chipboard star in the upper right corner. Layering embellishments makes it that much more interesting.


Supplies: Patterned Paper: Straight From The Nest , Opposites Attract (Winter), Cardstock: Must Have Foil Stack 8"x8", Must Have Bits and Pieces 2 (Pastels), Straight From The Nest Adhesive Cardstock , Stickers, Letters and Chipboard: OverStuffed Craft Kit, Sticky Sparkly Play on Words; Flowers: Perfectly Pretty Petals; Bling: Bling Goodie Box, Ink: Inky Alphas
Here's another LO about DD, and this one is a little less busy and has more "White space". I'm not a big fan of white space so I filled some of it wish color spray. Lots of brands make color sprays, and this one is by Tattered Angels. Paint, color sprays, ink, etc are great ways to customize your patterened paper. Sometime the paper is not quite the right color, or isn't exactly what you need, no matter how great it is. But always remember - you're the artist and you can cut it up and otherwise alter it in any way you like.
Once again I layered the embellishments - the #1 on top of the thought bubble, the bling heart on the chipboard quote, etc. The arrow I got by cutting an embellishment apart. Just remember that you can do anything you like with your supplies and the more you do, the more you make them "yours".


Supplies: Patterned Paper and Adhesive Cardstock: Straight From The Nest, Cardstock: Must Have Foil Stack; Stickers: OverStuffed Craft Kit; Letters and Chipboard: Sticky Sparkly Play on Words, Bling: Bling Goodie Box
Well, thank you everyone for taking a look at my creations. I am really looking forward to sharing more with you over the coming months, and I hope you all come to love the 3Birds products as much as I do!


love your layouts Ilene! The second is just great with all of the layering!
ReplyDeleteOMW Ilene! These turned out amazing! Such inspiration!
ReplyDeleteWay to start things off! Love your pages and photos!
ReplyDeleteIlene, your projects are wonderful! Way to kick things off!
ReplyDeletecute projects!!
ReplyDelete