Showing posts with label Ilene. Show all posts

Monday, August 2, 2010

Happy Birthday, 3Birds style!

I must confess I'm not much of a card maker. But the 3Birds products are just as great for cards as they are for scrapbook pages. When I realized I was in need of some quick and easy cards, I knew I just had to give it a go. Maybe you're not much of a card maker either, but you love to give handmade cards, since it makes the gesture that much more meaningful. If so, I hope my cards can show you just how easy making a card with 3Birds products can be. In fact, if you have cardstock, the 3D Embellishment Kit, and the Super Sticker Nestables, you're pretty much all set! My daughter is at an age where she goes to a lot of birthday parties, so I wanted to put together some fun, bright birthday cards that would be great for kids.


Supplies:
Cardstock: 3Birds Brights Cardstock
Sticker: Super Sticker Nestables
Embellishment: 3D Embellishment Kit
Bling: Bling Goodie Box


Supplies:
Cardstock: Must Have Cardstock
Patterened paper: Straight From the Nest
Letter Stickers: Overstuffed Craft Kit
Sticker borders: Super Sticker Nestables
Embellishments: 3D Embellishment Kit
Bling: Bling Goodie Box


Supplies:
Cardstock: Must Have Cardstock
Letter Stickers: Overstuffed Craft Kit
Sticker: Super Sticker Nestables
Embellishment: 3D Embellishment Kit
Bling: Bling Goodie Box

See - fast and easy, right? The new Super Sticker Nestables and the 3D Embellishments make cards simple even for a layout person like me :) Give it a shot - and we always love it if we inspire you to create something, so if we do, share your creation with us - just leave a comment to the post with a link back to your own project.

***Edited to add - I totally forgot to mention that I have a card using 3Birds products in ScrapStreet right now, so CHECK IT OUT (mine is at the bottom of the page - the Thank You Card). If you're not familiar with ScrapStreet, it's an online Scrapbooking magazine with articles, tons of LO's, and ideas every month, and it's totally FREE! So take a look!

Monday, July 19, 2010

Flower Power!

Hi everyone, it's Ilene today! Do you like to use flowers but think the super fancy ones are too expensive? Well, you can give your cost-effective 3Birds flowers some power! LOL On this first LO, I used plain paper flowers and stickled the heck out of them. You can use glitter glue or regular glitter. You can do many other things, including embossing, or using flocking. I think the results speak for themselves! On this first LO I also used Super Sticker Nestables for the circle and for the heart. And you can always embellish your borders and stickers with a little lace. Here, I used May Arts lace - it's the one called ribbon by the yard crochet lace. I cut it in half, which actually means I got 2 yards! And to get the pretty yellow swirls, I simply cut apart the border sticker in the new Super Sticker Nestables - Borders


Supplies:
Super Sticker Nestables (coming to HSN July 19) - That's TODAY!!!
3D Embellishments (coming to HSN July 19)
3Birds Perfectly Pretty Petals
3Birds Bling Goodie Box
Straight from the Nest Paper Pack
Must Have Bits and Pieces


I wanted to share another LO with you today. This one was super easy and quick to make since I used the Focus on Photos paper packs, so all the work was done for me! I used the coordinating 12x12 sheet, slapped on an 8x8 sheet and a 5x7 sheet, a border from the Super Sticker Nestables, and viola! If you take a look at the upper right corner, you'll see a large flower there. I used a flower punch and coordinating cardstock. I didn't want to leave it boring, so I gave my flower some power by using 3Birds So Many Sentiments Stamps :)


Supplies:
Super Sticker Nestables (coming to HSN July 19) - That's TODAY!!!
Focus on Photos
Perfectly Pretty Petals
So Many Sentiments Stamp Kit
Sticky Sparkly Vs. 5 Play on Words
Bling Goodie Box
Overstuffed Craft Kit
Must Have Bits and Pieces

Monday, July 5, 2010

Who needs flowers, right?

Hi everyone, it's Ilene , here to share a masculine LO with you! The new Straight From The Nest pp pack has wonderful variety in it, and some of the pp is perfect for all your dad/guy LO's. This one is of my wonderful DH - I started dating him 14 years ago. I loved the greens and browns here. This photo was taken in the Spring and I was happy to find pp that matched the photos without being "Fall" pp. I did a lot of distressing here to create a slightly more rugged, masculine feel. In fact, I think I made it masculine enough to pull off adding a little bling and flowers...I just couldn't help myself!


Supplies:
Patterned Paper and Cardstock: Straight From the Nest Adhesive Cardstock
Stickers, Letters: OverStuffed Craft Kit
Chipboard Embellishments and Title: Sticky Sparkly Letters and Shapes Vs. 5
Flowers: Perfectly Pretty Petals
Bling: Bling Goodie Box
Stamps and Ink: So Many Sentiments

Monday, June 7, 2010

First official DT post!

And I get to be the one to kick things off! How awesome is that :) It's me, Ilene, and I want to say hi to everyone who's reading. The DT has a lot in store to share with you guys and I hope you will all be inspired! A little bit about me - I have 2 kids and I promise you'll be seeing a lot of them :) I really can't help myself. Today I want to share two layouts that both feature my DD. She's 5, almost 6, and has quite a personality. I used the new foil papers with both layouts, and I love how it turned out. If you're afraid to try foil because it's got...well, quite a lot of shine to it, then you can try to tone it down, as I did, by only leaving small parts of it. I used it in moderation to accent parts of the layouts, and I think it added a lot of that "wow" factor and helps draw attention to the photos themselves. Well, take a look for yourselves.

The first LO is called "Art Show". I layered a lot of flowers and did some distressing. You can also cut the flowers in half, like I did in the corners for variety. Personally, I like a busy look on a page, and the more to look at, the merrier. You can do that by layering a lot and adding a lot of embellishments, and then layering the embellishments as well - for example, I placed a star-shaped crystal on the chipboard star in the upper right corner. Layering embellishments makes it that much more interesting.


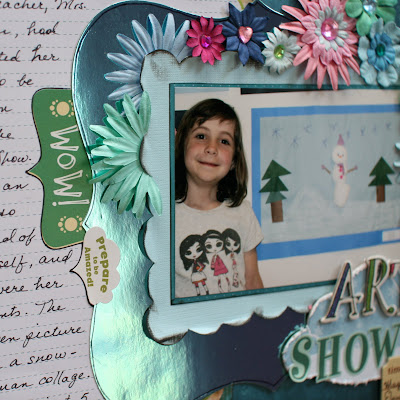


Supplies: Patterned Paper: Straight From The Nest , Opposites Attract (Winter), Cardstock: Must Have Foil Stack 8"x8", Must Have Bits and Pieces 2 (Pastels), Straight From The Nest Adhesive Cardstock , Stickers, Letters and Chipboard: OverStuffed Craft Kit, Sticky Sparkly Play on Words; Flowers: Perfectly Pretty Petals; Bling: Bling Goodie Box, Ink: Inky Alphas

Here's another LO about DD, and this one is a little less busy and has more "White space". I'm not a big fan of white space so I filled some of it wish color spray. Lots of brands make color sprays, and this one is by Tattered Angels. Paint, color sprays, ink, etc are great ways to customize your patterened paper. Sometime the paper is not quite the right color, or isn't exactly what you need, no matter how great it is. But always remember - you're the artist and you can cut it up and otherwise alter it in any way you like.

Once again I layered the embellishments - the #1 on top of the thought bubble, the bling heart on the chipboard quote, etc. The arrow I got by cutting an embellishment apart. Just remember that you can do anything you like with your supplies and the more you do, the more you make them "yours".


Supplies: Patterned Paper and Adhesive Cardstock: Straight From The Nest, Cardstock: Must Have Foil Stack; Stickers: OverStuffed Craft Kit; Letters and Chipboard: Sticky Sparkly Play on Words, Bling: Bling Goodie Box

Well, thank you everyone for taking a look at my creations. I am really looking forward to sharing more with you over the coming months, and I hope you all come to love the 3Birds products as much as I do!